Whirlpool Washer Transmission Repair (2007)
Whirlpool Washer Transmission Repair (2007)
Originally documented by Lee Devlin
A few months back, my Whirlpool washing machine suffered a failure: it stopped spinning. While every other function remained operational, the machine was essentially useless since the laundry remained completely saturated at the bottom of the tub after every cycle.
🔍 The Diagnostic Process
My first instinct was to consult the internet. A quick search for "Whirlpool washer won’t spin" led me to several helpful resources:
- Community-driven sites: Forums like
fixitnow.comwhere enthusiasts share free advice. - Commercial sites: Parts suppliers like
repairclinic.comthat cater to DIYers.
I followed a process of elimination to find the root cause:
Lid Switch (Checked first, functioned correctly)
Motor Coupling (Unlikely, as the agitator was still moving)
Clutch/Brake Mechanism (Inspected and found to be in good shape)
Transmission The Culprit
Diagnostic Flowchart
🛠️ The Teardown
Because my laundry room is a cramped alcove between the garage and kitchen, I disassembled the unit and moved the components into the kitchen for more space.
Removing the Transmission
To extract the transmission, you must remove the bolt at the top of the shaft that secures it to the agitator. This requires:
- Removing the plastic agitator cap.
- Removing the translucent seal beneath it.
[!IMPORTANT] Warning: Ensure the seal is reinstalled perfectly during reassembly. If water penetrates the bolt compartment, the bolt will rust and fuse to the shaft.
Once the transmission was out, I removed the top cover and drained the oil into a jar. Given the mess, I wore vinyl mechanics gloves.
⚙️ Technical Analysis
The transmission is a mechanical marvel that manages multiple states based solely on the motor's direction—no solenoids or shifters involved. It handles:
- Agitation
- Spinning
- Neutral
Simultaneously, a portion of the drive shaft powers the pump. The internal mechanism relies on a rack retainer consisting of cams, gears, and pawls.
While simulating the motor's movement, I discovered the failure: a shoulder pawl stud had snapped off at the threads. This stud acts as an axle to lock the plate to the spin gear; without it, the rack retainer simply spun freely.
The Repair Strategy
The stud wasn't sold individually. However, I found a Neutral Drain Pack from repairclinic.com. This kit included two different studs—Whirlpool had apparently upgraded the thread size in newer models to fix this specific weak point.
My plan was as follows:
- Extract the broken threads from the main gear.
- If the threads were ruined, drill and tap the hole for the larger, newer stud.
- Replace all aged components (the machine was 15 years old).
The Extraction Process
Extracting the broken screw was the hardest part. I initially broke a drill bit, but eventually created a pilot hole. I then took the part to my workplace to use an arbor press and an "easy out" extractor. This allowed me to remove the broken threads without damaging the gear.
💰 Cost-Benefit Analysis
I spent approximately $23 on parts. Here is how that compares to other options:
| Option | Estimated Cost | Pros | Cons |
|---|---|---|---|
| DIY Repair | ~$23 | Extremely cheap, educational | Time-consuming, risky |
| Professional Repair | $300+ | Guaranteed fix, fast | Expensive (likely full transmission replacement) |
| New Machine | 900 | Modern features, warranty | Very expensive, wasteful |
Mathematically, the savings can be expressed as:
🏁 Final Results
After some "head-scratching" to get the assembly back together, I manually verified the neutral and agitate modes. A test cycle without clothes confirmed that the spin mode was fully restored. The machine has since worked for several years.
"I generally don’t fix things myself just for the savings... I do it more for the educational experience and the satisfaction of knowing that if it ever breaks again, I can choose to either fix it myself or buy a new one."
Visual Documentation

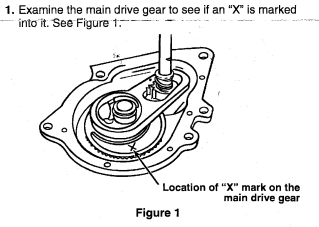
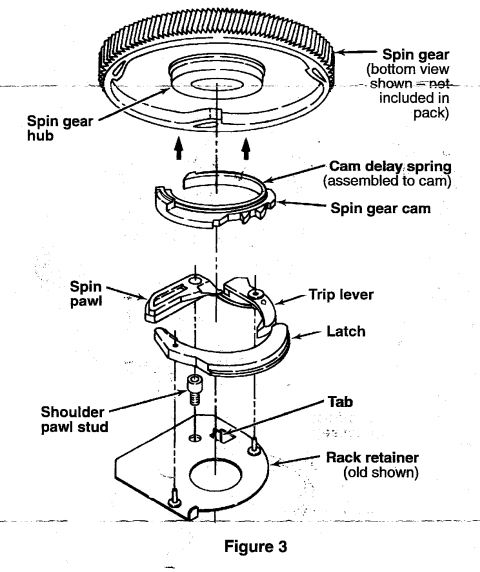

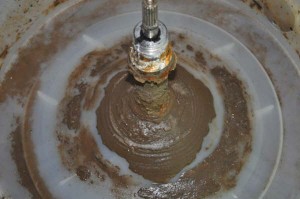
Update (2009-01-07): Due to ongoing interest and emails regarding the disassembly process, I have uploaded additional imagery showing the internal state of the transmission.


